Showing posts with label sewing. Show all posts

Tuesday, March 17, 2009

Taste Testing for Better Flavor

Taste testing eggsAfter enjoying the opportunity of tasting some real honest to goodness farm raised eggs we've become enamored with that excellent home-grown flavor. We have decided we no longer like the bland taste of pale yellow flavorless eggs from the grocery store. We have our hearts set on finding a source for eggs with that tasty good old fashioned flavor. As yet we have not located a local source of fresh farm eggs, so we're still shopping at the big box mass market grocery store. Meanwhile we've been taste testing other brands of eggs hoping to find some that come closer to that farm-fresh flavor.

Here we are sampling Eggland's Best, Sunny Meadow Farm, and Eggland's Cage-Free eggs. We agree that of these the Cage-Free are the best so far. Once we have some farmer's markets start up this spring I'm going to ask around to try to find a local source of farm-fresh eggs that are full flavor. I cannot wait to pin down a source. We're likely to find more fresh farm flavors with veggies and fruits, too. I'm looking forward to that as well.

Close up of my heart pincushionI found a free pattern on-line to make this Heart Pincushion from The Pattern Basket. One day last week I had some time to sew with a friend. This was my project for the day -- to sew up two of these pincushions. One for my friend and one for me. It went together fairly smoothly, but it sure is surprising how long things take to make. I had it in my mind they would only take an hour or so. What with all the chatting and visiting, these two pincushions took the whole afternoon. That's okay, though. We had a good visit while making them. In fact it turned out to be a very pleasant day. It's always fun to spend time with a friend.

Blogging about my heart pincushionMy friend picked the pink color fabric. Then we selected the dark blue print with pink accents to go with it. I changed it a bit from the pattern instructions. I quilted both the top and bottom pieces instead of just the top. Then I could not find the plastic pellets for weighting the pincushion so I used glass marbles, used for flower arrangements, instead. A handful of those shiny glass marbles was plenty to weight them. I think if I make any more of these I will do them in a smaller size. It is pretty large as far as pincushions go. It could easily be made smaller for a nice, handy size pincushion.

When looking again to re-locate the source of this free pattern I ran across this site with a tutorial for a similar 1800s Heart Pincushion.

Monday, March 2, 2009

Word Clouds

I found out about this cool site the other day. It's called Wordle. You can enter in any written information, link to a blog or any other web site, and the program creates a word cloud. It calculates the frequency specific words are used then displays them in varying sizes and orientations to offer you a visual image of the written words. It's kind of cool.

I'm feeling quite a bit closer to normal now. Most of my symptoms of the passing sinus infection have subsided or are minimal. I am working on the energy part of the equation. Can't say that has reached full maximum yet. I'm thankful it is considerably better.

Tomorrow I will be quilting/sewing with a friend. I am looking forward to that. I've been away from any socializing long enough. It'll be fun to get in some sewing time as well.

Monday, February 16, 2009

Hopping the Bunny Trail

One of the pillows in progress.I've been away blogging for awhile, but now am back. One of the things I have sewn recently was wedding ring bearer pillows for my niece's wedding that took place last Saturday. I embroidered the designs on my Pfaff Creative Vision then stitched the pillows together. This photo shows one of the pillow in progress.

Two wedding ring bearer pillows to choose from.I made two pillows for my niece to choose from. I have not heard yet from her which one she decided to go with. It was fun to do both of them since they turned out looking so different with the finishing touches on each one.

Evidence of the bunny.We have bunny rabbits living near us every year. It doesn't seem to matter that we've got three dogs, the bunnies have been coming around every year for some time now. Here's the evidence to prove it.

A closer look at the bunny tracks by the gate.I find it kind of hard to believe that bunnies are able to squeeze under the bottom edge of our gate. It sits so close to the ground. I heard they were able to slide through very narrow gaps in fencing to squeeze through to an area they want to get to. I just never realized it was quite this narrow. There just doesn't seem to be much room to get past this gate.

I woke up to see ice and frost on the trees.It was absolutely beautiful outdoors this morning. I woke up to find a winter wonderland of ice and frost on all the trees. I just had to grab my camera to get some pictures. Granted these are not the best photos. They fall far short of ever capturing the beauty of the glittering scenery that was our yard.

comparing the winter steps to those of this past summer.The snow has been piled high all winter with shoveling off snow and ice from the back steps and the walk-way that allows the dogs to get out and about in the back yard. This view of the back door shows how high that pile is at the moment. There is actually a bit less than there had been a few weeks ago. We were blessed with some warmer than normal temps for a few days that brought on a wee bit of a melt of some ice and snow. No fear! There's still lots more outside! It'll be winter here for a while longer.

Friday, December 5, 2008

Tossed Chickens

Tossed Chicken fabricTossed Chickens - that's what this type of fabric is referred to . . . tossed . . . when the images are scattered across the surface. Somehow that strikes me as funny. Okay, to really "toss" chickens isn't funny, but the idea, the cartoon image, of chickens being "tossed" strikes me as funny.

Too many goofy cartoons as a kid? Nah! Just a unique way of looking at the world! Tossed chickens is funny, it's just one reason I like this fabric. Another reason is I've noticed I kind of have a thing for chickens. I've been noticing how many chickens I have around in the house. I've somehow been collecting them for a long time without really noticing or trying. (Maybe I have some farmgirl in me). I'll have to one day do a chicken inventory and see just how many it adds up to. In fact I recently purchased an embroidery design to make accessories for the kitchen with chicken designs. I haven't embroidered them out on my machine yet, but that will come someday soon.

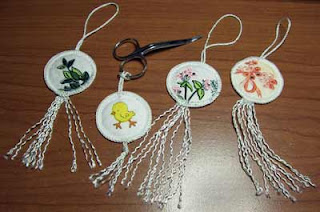
Scissors with hand made hanging ID labelI made this hang tag to label my scissors. It is one of the projects I did for a recent class I taught. These quick, easy little hang tags can be used for labeling items, gifts and packages, organizing labels, even on a tree as a Christmas ornament. They would tuck into a holiday card easily.

Here the little chick is the featured image on the front side of my scissors fob. When it is flipped over the label reveals the owner's name (that's me). It's a great way to identify your items when heading off to attend a class and to keep track of your personal items.

An easy way to identify your items in the classroomI printed info onto card stock with my computer to use on the back side as a label. It is an easy project and really doesn't take that much time to make them.

As demos for the class I taught, I made some hang tags at each class session. One doesn't need a fancy sewing machine to make these. Any old sewing machine will do the job. If you want to sew the basic little hang tag, your simplest machine will work. Those who want to make the embroidered ones would need an embroidery machine. And fussy cut fabric is a great way of making use of printed fabric images. These would also be fun with photographs cut to feature the faces of family members as well.

I used a punch from my scrapbooking supplies to cut the circle shapes from the printed paper labels. It is fast and easy. You can get perfect alignment of the words by turning the punch upside down and viewing the words from the back side as the paper is being punched. The cording that forms the handle and the tassle is a polyester or nylon cord used to string window blinds. I also use a similar thin cording like this to make my Piping Hot Binding for quilts. It's fun to think of other ways to make use of these tools aside from their original designated purposes.

This chicken tag features the fabric fussy cut to highlight the chick. The others shown are actually cast offs of embroidery projects that were goofed up and had flaws in them. I didn't want to just throw them out - I save them thinking I could use the flawed sew-outs some day in another project. This was the day. Cutting circle shapes from parts of the sew-outs yielded these cute little hang tags/ornaments.

A variety of tags/ornamentsI glitzed up the hang tags with heat set crystal embellishments. That is another very easy thing to do. The heating tool (mine is a L'Orna Heat Wand) heats up the glue on the back of the crystals. When applied properly the crystals don't come loose even with machine washing and the heat from a clothes dryer. Once set, the crystals are adhered for good.

The heat set crystals certainly add that extra touch of glitz and sparkle. I like the way these little beauties turned out. I'll make a few more and use them on our Christmas tree.

Zoom in close to see the crystal embellishments.This project is also a good way to make use of those practice sew-outs when doing machine embroidery. There's always times something doesn't turn out right - a mis-alignment of the black outline from not stabilizing properly, a mis-threading with the wrong color thread sequencing or something along those lines. I have quite a few un-used embroidery sew-outs I can make use of on small projects like this. Using them up with another project makes it so much better so I don't feel so bad (and wasteful) about embroidering something out that I don't end up using right away.

The idea that's very popular right now - to reduce, reuse, recycle - is manifested perfectly in this project. It goes right along with the current "hand-made" craze that is all the rage and getting so much press of late. I picked up a book a month or so ago called Handmade Nation. To read the book one would think this current generation is the leader and inventor of all things crafts. They've certainly got their spin on things in the current craft world today, but a lot of it is certainly not new. Some of the "new" crafty ideas seem very nostalgic to me. They're not re-inventing the crafts of yester-year, but updating some of the techniques that have been around for awhile for a re-vamped look.

I love it though. To see some of the "new ideas" is pretty cool. It takes me back to younger days in many ways. And I always like to see a new twist on ideas.

Thursday, November 20, 2008

Metallic Threads and Fancy Stitches

A closer look at the runner with its metallic thread detail.My friend, Patty, shared with me the beauty of her new table runner. It is a superb sample of using a good basic technique for a big "WOW!" effect.

The runner is made up of a series of decorative stitches carefully placed and sewn. It is absolutely stunning with the use of all those metallic threads in golds and silver. She tells me the piece is sewn with Kreinik threads.

With the proper needle (metallic or topstitch) metallic threads provide such a lustrous result with ease of stitching.


Patty's beautiful table runner.
From a distance it looks almost as if there are braids or trims sewn into place. But upon closer inspection you will notice it is really just row after row of decorative stitches. Fabulous!

The beauty of the piece is the combination of decorative stitches. This stitch stacking method is really a simple method with wonderful results sure to impress your friends and family. If you have always wondered what to do with all those stitches on your machine, this is a perfect example of the potential for using them.

Details of Patty's runner features metallic thread and gorgeous machine stitches.Patty has created some visual variety in the pieced background for the stitching. It consists of a black shimmery type of decorative fashion fabric alternating with another black with a more matte finish and plain weave. This matte fabric serves as a fine choice to support and show off the metallic decorative stitches. What a great combination of fabrics and stitches. The long tassels hung from either end of the table runner were also hand-made.

Great job, Patty! I love, Love, LOVE it!

Monday, November 17, 2008

Sewing Day

I spent the day sewing with a friend. It was a good day. I didn't do anything extra special or different, just a regular sewing day. I enjoyed the day. My husband came home and commented that I had a smile on my face when he came home. Knowing I spent my Mondays (day off work) sewing he commented that I must have had a good day of Sewing Therapy.

Yep, It was a good day.

I'm working on another scrappy quilt. It's based loosely on a quilt in McCall's Quick Quilts, the January 2009 issue. It's a quilt called "cozy cabins" using the log cabin pattern - courthouse steps. One change though, my strips are 2 1/2" rather than the 1 1/2" strips shown in the magazine. So my quilt will be a bit larger than what is shown.

I took a photo of my progress. It's scrappy, with a lot of black, gold, orange, purple and green. So far I'm liking this color combination. There is one print focal fabric I'm pulling the colors for my fabric from. I still need to add some other fabric colors. There's lots of room for more color since it's a scrappy quilt. I just love Scrappy Quilts. I'll keep you updated with photos as time goes on.

The previous quilt I was sewing on is awaiting the blocks to be squared up and sewn together. Then it goes on my quilting frame. The frame was cleared off a few weeks ago. I need to get that quilt framed up and start the actual quilting process. That should be interesting . . . afterall, it will be my first try at quilting on my own quilt frame.

Yep, there will be photos taken all along the way. Hopefully I catch on to the quilting process quickly with that first quilt.

More to come on that . . .

Thursday, November 13, 2008

Pin Wheels and Couching

I bought the Pfaff Yarn Couching foot - I've been playing lately.I recently purchased the Yarn Couching foot to use on my Pfaff sewing machine. I think this foot is really cool. The project I'm working on right now uses this foot to help couch down yarns. I'm embellishing a sweatshirt to make into a jacket. This project is being used at work to teach sewing techniques and tips. I'm planning on doing a different step of the process each week to feature a different sewing techniques for this class.

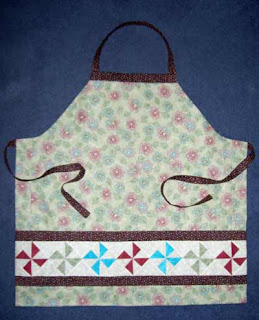
I've been sewing on this project.Each of us at work sewed up aprons for the sewing sessions mentioned in the previous paragraph. These Thursday classes we're offering at work are being held each week during the Thanksgiving and Christmas holidays. I followed the purchased pattern, but with a few minor changes.

My new apron - made for use in a class - will come in handy for my holiday cooking.This apron will come in handy over the Thanksgiving holiday. There is a tablerunner and a couple of potholders with this pattern as well as the apron. I plan on making those also if I can fit in the time to do so within the next couple weeks. I like the look of these items. The pattern for the apron is ideal for embroidering an endless hoop design. I may make another apron with a strip of embroidery inserted in place of the pin wheels.

a close up of some of the pinwheelsHere's a close-up shot of some of the pin wheels on my apron. I goofed up by making one too many pin wheels, but left the extra pin wheel in place rather than ripping it out. I just added a bit more fabric than the pattern called for to accommodate the extra width of the extra pin wheel. It's a minor change, and makes my apron a little wider. I'm okay with that.

Saturday, October 18, 2008

Home Dec Pillow #2

Home Dec Pillow #2 front view with pin tucks, welting and twin weltingJust a quick post for now, I'm ready to head off to bed. Again, it took a lot longer than I anticipated to get some things done today that I wanted to accomplish. And I've got an earlier than usual day tomorrow. Yikes! this will be really short . . .

Just wanted to post the photos of the second Home Dec Pillow. The pattern is pretty much ready, but will do some tweaking on it when I get home from work. This view shows the pin tucks in the band along the front. This area is framed on two sides by twin welting. Thicker welting is used around the perimeter with a gathered technique.

Home Dec Pillow #2 back view with zipperThe back side, shown in this view, reveals the zipper closure and some of the fun new stitches on my Pfaff Creative Vision.

I like the way this pillow turned out. It's pretty much like I envisioned, so I'm happy with it. It will go on the couch in our living room (along with pillow #1) when store classes are over.

Okay, Off the bed . . .

Sunday, October 12, 2008

Home Dec Pillow

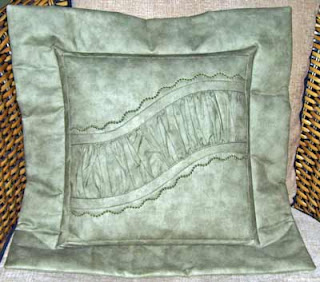
My original Home Dec Pillow #1I wrote instructions for my original Home Dec Pillow #1 for a class at work. This is the first of two different pillow classes we are offering this fall. I will be posting the pattern on my Etsy site within the next few days.

This pillow teaches a lot of different techniques. The center curve showcases fabric manipulation with puffing, a gathering technique. Fabric strips cut on the bias are used to cover the raw edges of the central puffing/gathered area. This same bias strip is used around the perimeter to set off the main part of the pillow from the flange area. The reverse side of the pillow teaches an easy closure with two buttonholes and buttons.

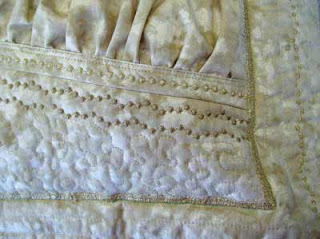
Close up of my pillow shows corner treatment.The corners of the bias strips sewn aroung the edge are mitered for a neat appearance. This is actually a relatively easy thing to accomplish. I took step-by-step photos of the pillow construction for the pattern. This makes each technique easily understood.

Another close up of the puffing and use of bias strips along the curved edge.Decorative stitches are sewn following the curves of the center puffing element. I like the candle wick stitches on my Pfaff Creative Vision so that is what is used here on my pillow. There are lots of beautiful decorative stitches on sewing machines today so the options for creating multiple pillows with different stitch combinations are unlimited. I love seeing decorative stitches used to embellish home sewn items.

My friend, Patty, stitched her version of this pillow using my pattern.My friend, Patty, took this pillow class at the store and was happy to share her results. She is a creative person, always coming up with good ideas of her own. Here she used gold metallic thread in some of her decorative stitching and added a few of her own flourishes to the pillow. Rather than forming an "S" curve with the puffing, Patty chose to stitch her gathered area as a straight, diagonal element. She incorporated much more stitching on her pillow than I did for additional interest. Her pillow is stitched with stippling, additional top-stitching, and more rows of decorative stitches than my version.

A close up of Patty's pillow with her stitch variations.This detail of Patty's pillow shows a close up of the stitching. Another variation is the use of a satin stitch to frame the center area of the pillow and set off the flange. This variation is a great alternative to the bias strip border I used. It achieves the need to cover the raw edges of the puffing and also helps to set off the boundary for the flange. You will notice that Patty also did some stitching on her flange as well.

I like your version Patty. Thanks for allowing me to share it here on my blog!

The pattern for Home Dec Pillow #2 will be completed soon. It is a sister to this one, but has a number of other techniques that will be incorporated into it. I'll post more on it once the class has taken place in a couple of weeks.

Thursday, May 22, 2008

Circle Jeans Quilt Update

I was going to post a link to my instructions to my Circle Jeans Quilt, but it seemed confusing because I thought I originally submitted it to About.com but now see a copy of the instructions on equilter.com. The link in my previous post actually does not take you to About.com, but to the equilter.com site where the instructions can be found. Looking further I found the instructions copied to a number of different sites along with photos of quilts made by other quilters.

How interesting to see so many people have used my instructions to make their own quilts. It seems to be a popular one for recycle enthusiasts. That's part of the reason I wanted to reference it again after so much time - recycling has become so big again now with everyone going "green" for the environment as well as saving money due to high gas prices and increases in other products as a result of those high prices.

I'm glad to see the instructions have been such a hit. Hopefully many others will see it again here on my blog and keep some of that denim out of land fills and find a new life in a recycled quilt.

There are more links I just ran across here, here, here, here, here, here, and here.

This site shows some step-by-step pictures of the process.

Here is another site with step-by-step tutorials on the Circle Jeans Quilt.

And another website with photos of the process.

This forum's page discusses my Circle Blue Jeans quilt and using flannel instead of denim. Actually the very first person I showed this quilt pattern prior to submitting it to About.com was for a friend who wanted to use regular quilter's cotton instead of the denim. We spent an afternoon visiting while I showed her the steps. I would suggest using a square of batting inside underneath the "window" square to give it some warmth. The only drawback with using cotton is all the seams are on the bias. If you are not careful you will find they tend to unravel easily and may stretch out of shape when sewing around the circle shapes. That's why I like the denim, it doesn't have that same stretch to it. This might also be fun to do with felt circles. I might try that as a small table topper one of these days.

Here's another forum talking about a program Fons & Porter did calling it a Peek-a-Boo Quilt for Baby. Apparently they made theirs with flannel. There were several other links to various sites and photos of finished quilts from this forum. Have fun perusing the various links.

Have fun sewing one for yourself or a loved one. They make great lap quilts. They're certainly warm! A bit heavy if you make them too big, but certainly warm!

Here are a list of the links I've found so far in the event one of these doesn't work for you, you can copy and past them to your browser for yourself:
http://sockshavenothumbs.blogspot.com/2008_02_01_archive.html

http://shelinascreations.blogspot.com/2006/08/denim-circles-quilt.ht

http://www.equilters.com/library/jeans/jeans_gallmolly.html

http://www.equilters.com/library/jeans/jeans_galldina.html

http://profifrau.blogspot.com/2008/01/circle-jeans-quilt.html

http://home-and-garden.webshots.com/photo/1055577411016078061xKWWgM

http://home-and-garden.webshots.com/photo/1055496403016078061udOtBX

http://home-and-garden.webshots.com/photo/1055496654016078061WAheBu

http://sockshavenothumbs.blogspot.com/2008_02_01_archive.html

http://anitaestes.blogspot.com/2008/01/rob-peter-to-pay-paul.html

http://shelinascreations.blogspot.com/2007/04/denim-circle-memories.html

http://www.quiltinaday.com/community/topic.asp?forum=2&topic=4565

http://boards.hgtv.com/eve/forums/a/tpc/f/5894011632/m/4631099853

I think that's more than enough links for me to look at tonight. I'm sure you can find more photos of other quilter's Circle Jeans Quilts if you do your own search. That's how I found these. Search "Circle Jeans Quilt" in your own browser and it will take you to lots of references to this quilt and all kinds of variations from it. It's kind of fun to see so many renditions of this.

Random Studio Photos

Okay, so I thought I'd get out my camera again to take some random Sewing Studio photos. These, in no particular order, are some of my interesting collection of "stuff".

My first embroidery machine, the Designer 1, is still a favorite.
My Designer 1 was purchased many years ago as my first embroidery machine. I have always enjoyed this machine. Even though I have a newer Pfaff model, this one is still a favorite of mine. If you have ever considered purchasing a sewing/embroidery machine I would definitely recommend this brand and model. Of course they have since made an update where the floppy disk drive is now replaced with a USB port for a memory stick. I decided not to have mine updated because I have so many designs on floppy and the slightly slower loading time doesn't bother me.

My Husqvarna Viking wall clock
This is a purchase I made when I attended a Husqvarna Viking Convention for machine and software training some years ago. I managed to get it and a few other items in my luggage and it survived the airport attendant handling to grace my Sewing Studio wall. It had been stuck at the time shown in the picture for some time until tonight when I inserted a new battery. I have moved its location to another wall above my desk to hopefully help me better track my study time. It's happily ticking away as I blog!

Cut out denim circles for a Jeans Quilt
I mentioned this Jeans Quilt in a previous blog earlier this month and also posted a link to the pattern I submitted to About.com some years ago. Here's a photo of some denim circles cut from recylced jeans, ready to sew. You can see the plastic coffee can lid on the rear left pile. It's the same one I've used for years. These will go to make a new car quilt I'll use later this fall when the weather turns cold again.

Husqvarna Viking Banner
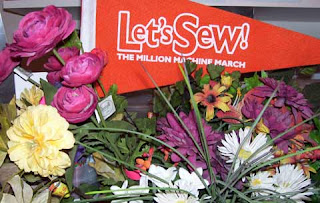
This orange banner was something given away at a Husqvarna Viking convention when they rolled out the new Viking Designer SE. The million machine march was a play on the slogan once used for the million man march several years ago. This was a fun convention, very lively as everyone in the audience had banners to wave, balloons with the Viking logo were released, bells to ring and whistles to blow at the new machine unveiling. Lots of excitement and lots of noise. I have wanted to sew a string of banners in this same size to decorate my Sewing Studio for quite some time. That's another idea on the back burner awaiting some free time.

What's on my cutting table?
I've seen weekly photos on some blogs that show "What's on my Desk" and thought I'd start one in a similar vein. This one will go up on Wednesdays - "What's on my Cutting Table". I want to try to do at least some sewing every week. So far that has been pretty minimal while I've been busy with my on-line classes.

What's on my Desk?
Okay, while I'm at it, here's the answer to "What's on My Desk". As you can see I'm well equipped with iced tea and what's left of a frappacino while I was studying for classes. Here I had just opened my blog page to make this update. As soon as I'm done taking the "Blog Break" it's back to studying. Nose to the grindstone and all that.


I was looking on-line for some material for a class project and happened upon a news report about Starbucks changing their logo recently and how the logo change is stirring up controversy, apparently it's causing some uproar. This is a picture of a mini taste-testing cup when I tried a new flavor over the Christmas holiday last year. It is currently holding a batch of fortunes from fortune cookies consumed during a few Chinese food meals. I keep thinking I'll use them someday in a collage or in a fabric journal. Just another idea rolling around in the back of my mind.

Starbucks logo is in the news
Anyway, the controversial new logo design hasn't shown up in our local Barnes & Nobel Starbucks yet. I never paid that much attention to it before. It's interesting how one of my classes this week covers images used in advertizing and how they need to be chosen carefully so as not to offend various groups and those from different cultures. The article I read said Starbuck's sales have slumped considerably since gas prices have increased so much lately. They suggested this remake of the logo is an attempt to stir up interest and increase sales. Very interesting!

Sunday, May 18, 2008

Introducing another household pet

Harold, our adopted goldfish was left to us after Spring BreakWe inherited this goldfish, Harold, from my youngest son, Josh when he came home for a visit during Spring Break. Since they closed the dorms at that time he couldn't leave the fish behind. Harold has since become our adopted fish. It's just a tiny little tank - what a lonesome life this fish has been called to live. But it has trained us well; when it keeps coming to the top corner of it's aquarium we know it's looking for food. Thus we oblige it a couple times a day. Pretty low maintenance with dropping in fish flakes and occasionally changing the water in the tank.


You'll never know how many times I tried taking this picture and just missing. I would have thought a little fish swimming round in circle would be a bit easier to capture on camera. I had lots of pictures of it just coming into view, just exiting from view, out of focus, glare from the tank, etc. I see a bit too much flash on the fish here, but this picture will have to do. It was the best of the bunch.


Mini Me Stitched - this embroidery sew out was stitched to demonstrate the PictureStich features of my embroidery software program.I ran across this stitch out when I was looking for something else the other day so thought I would share it. I made it using the PictureStitch module of my Husqvarna Viking Professional software program. PictureStitch works by turning an image into a stitched design. It can be done in a single color like is shown here in black, or with four colors of thread that are supposed to represent the four colors you see in printed images with cyan, magenta, yellow and black. I like the single color I chose for this rendition. The size is not more than 6", but they take a bit of time to stitch out. Obviously the four-color option takes longer than the single-color choice to stitch. It is a picture of me when I was a little girl. It is black thread stitched on an ecru muslin background. The project was for a software class I taught last year. I haven't made this sew-out into anything yet. It was going to become a page in a fabric book I was working on, but then thought maybe I'll make it into a totebag. Those seem to be so popular now with the decreased use of plastic shopping bags.

Well we've loaded up the truck and plan to head off to see the boys tomorrow. They're moving into an apartment together for the summer. So we packed up some of the last remaining "stuff" that belongs to our youngest son. He has decided not to come home to stay with us this summer. It looks like he's on his own from here on out. I've already started the re-arranging of that room to reclaim it for our turf. There still remains some lingering belongings from both the boys. They say they will come back to claim the last of their items sometime, but it is down to very little. I have already boxed most of that into plastic bins and tucked them away in a closet. It looks like we really are empty nesters now. Am I sad? Yes and no. It's a good feeling to see they are able to stand on their own. I remember that time of life as kind of fun when I did it, so I'm happy for them and know they will do well. Will we miss them? Yes, I think so. But I know we'll be okay with that. They are only a phone call away.

Friday, May 9, 2008

Rested again

I took the time to sleep a little longer today with a nice long afternoon nap. I have not done that in a long time. What a difference if makes to get some extra sleep!

It has been overcast and rainy throughout the day, so this was a good day for a nap. There is a chance of snow in our forecast for tonight, but so far it's just been cool and rainy. The grass has really greened up lately. It still feels too cold to put geraniums in my front step flowerpots. Whenever I come and go I think it won't be long now. I love the look of geraniums in pots on my steps. I'm hoping another week will make enough of a difference for some warmer weather to come in. Those pots sure look vacant without flowers.

Between getting my nap for those extra Zs and the cool rainy weather I haven't taken the dogs out on a walk now for two days. They've had to settle for just spending time outside in our fenced backyard. They don't seem to relish the cool windy, rainy weather very much either. It's just in and out, real quick! The two little ones seem content with staying curled up in their kennels on days like this. But I can tell Ginger is a bit antsy to do something different. She probably wouldn't mind the cold and rain so much if it meant getting out for a walk. We'll see if there's a break in this weather tomorrow; maybe she and I can just get out regardless of the weather.


Jelly roll sitting on a stack of charm packs and fat quarters.My Sewing Therapy will have to include getting back to organizing my stash. I still have some sorting and purging to do. This pile is definitely staying.

This is a quick peek at just a tiny portion of my fabric stash. These fat quarters, charm packs (a collection of five-inch squares) and jelly roll are a few of my more recent acquisitions. I just love looking at fabric! All the different colors and patterns available are wonderful. The embroidery sewout tucked underneath the charm packs will be turned into a pillow at some point. It is one of the last things I embroidered before I completely dismantled my sewing studio to re-configure the furniture for more room and to get re-organized.
Here's a look at my new Pfaff Creative Vision. I bought it earlier this year, but have not taken very much time to sew on it yet. It's somewhat annoying actually that I'm not making as much use of it as I would like. It seems my time is stretched among so many things. So I try to sneek in a little time here and there.

The Pfaff Creative Vision is a fabulous machine.

I satisfied my need for a tiny bit of Sewing Therapy last night before I went to bed by sewing about a dozen seams on a few quilt blocks. It's a scrap quilt. I've got some scraps sorted by color in a few pull-out drawers. That combined with a tremendous urge to "just sew" lead me to sew for a very short bit. Even if it's 15 minutes a day, I think I'll continue working on this scrap quilt a little each day.

Quiltmaker magazine March/April issue shows pattern I'm working on.

The pattern is from this year's March/April issue of Quiltmaker magazine. There are only three size blocks to cut so it's a pretty simple pattern. I like the scrappy look of it.

Front side of free-motion flower piece.Free-Motion can be alot of fun to play around with. This was a test sample for a tote bag. It was something I worked of for a class project I was developing. I thought it was a fairly easy project as a basic totebag. The creative fun was in the free-motion for the front side of the bag.

Back side of free-motion flower piece.I did this project a short while back. The flower is hand drawn with Fabrico permanent fabric markers onto plain fabric. It was heat-set with an iron then layered with quilt batting and a piece of backing fabric. The black thread is free-motion stitched to set off features of the flower and other elements in the piece. I left the back side plain as a black and white rendition in reverse. This was actually a fun, freeing sort of thing to do.
Close up of free-motion to show stitching detail.To do free motion sewing, put on a darning foot and drop your feed dogs. You are moving the fabric manually since the feed dogs are lowered they cannot move the fabric. This means you can move it in any direction, not just forward and back under the needle. I've done other thread painting pieces that are more fully filled with thread in a variety of colors to create the image. This is much easier with just the black thread. In thread painting you use multiple colors of thread to give depth, details and interest to the work.